Help And Support
Collections - Invoice Management
-
I. About Invoice Management on OCBC Velocity
What can I use for this solution for?
Invoice Management on OCBC Velocity enables our business banking customers to manage e-invoice documents and purchase orders. With this solution, you can:
- Create and reconcile sales e-invoices (including invoices, credit note, debit note and refund note)
- Create and reconcile self-billed e-invoices (including invoices, credit note, debit note and refund note)
- Manage and reconcile bills e-invoices
- Create purchase orders
- Submit e-invoices to the Inland Revenue Board of Malaysia (IRBM), also known as Lembaga Hasil Dalam Negeri (LHDN), for validation and reconcile them
- Add OCBC as your Intermediary in MyInvois Portal and connect OCBC to MyInvois Portal Intermediary in OCBC Velocity
- Retrieve e-invoices from MyInvois Portal and reconcile them by registering ERP system
- Register OCBC as ERP system in MyInvois Portal and connect OCBC to MyInvois Portal ERP system in OCBC Velocity
- Request for cancellation or rejection for e-invoices within 72hours
Businesses like yours can now streamline their invoice-to-payment process through OCBC Velocity – a one-stop shop for making transactions and invoicing.
What is e-Invoice?
An e-Invoice is a digital representation of a transaction between a supplier and a buyer. e-Invoice replaces paper or electronic documents such as invoices, credit notes, and debit notes. An e-Invoice contains the same essential information as traditional document, for example, supplier’s and buyer’s details, item description, quantity, price excluding tax, tax, and total amount, which records transaction data for daily business operations.
What is LHDN e-Invoice Implementation Timeline in Malaysia?
Below is the e-Invoice implementation timeline:

Note: e-Invoice implementation timeline been updated on 7 December 2025
Source: Inland Revenue Board of MalaysiaWhat are the user profiles and corresponding functions that are available?
The user profiles availed with this solution are the same as OCBC Velocity’s. Customers on the Basic Plus Service Package are entitled to one user profile (“Authoriser & Maker”) and can access all invoice management functionalities.
Customers on the Classic Service Package are entitled to two user profiles:
“Maker” and “Authoriser”.Makers can perform the following functions:
- Create invoices, credit notes, debit notes and refund notes without requiring authorisation
- Create purchase orders
- Set up invoice templates
Authorisers can perform the following functions:
- Create invoices, credit notes, debit notes and refund notes without requiring authorisation
- Authorise purchase orders to be sent
- Set up invoice templates
- MyInvois Portal intermediary setup
- MyInvois Portal ERP system setup
Note: Premium Service Package will be available for OCBC Velocity Invoice Management soon.
-
II. Getting Started
Is this solution available to me?
The solution is available to and free for all OCBC business banking customers on the Basic Plus or Classic OCBC Velocity Service Packages – no additional application is required to start using it.
Do note that your business will need a taxpayer profile in LHDN MyInvois Portal to add OCBC as Intermediary and register ERP system.How can I link my company to my MyInvois Portal Profile?
Step 1
Log in to your MyTax and you will need to link your company to your profile. Click on the User icon on the right Role Application
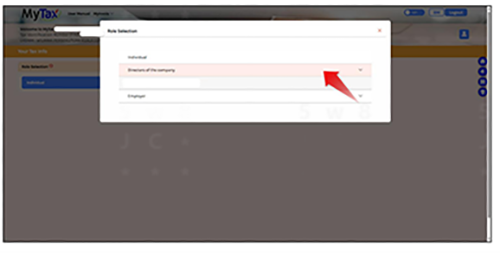
Step 2
For Type of Application choose “New Application”. For Type of Role, choose “Director of the Company” (for Sdn Bhd), or “Business Owner” (for Sole Proprietorship, Enterprise, or Partnership). You will need to fill in registered company’s TIN number and upload supporting documents. Once you’re done, click Submit.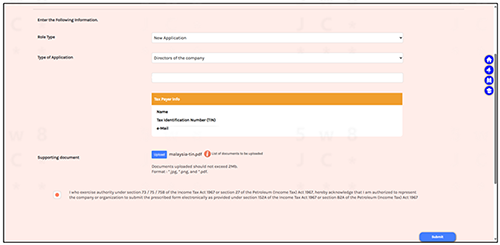
Step 3
It will prompt you to key in your password again. Key in your password and click “Signature”.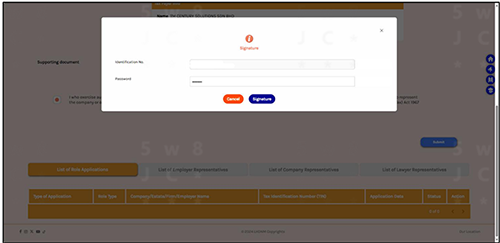
Step 4
A success message will appear and you can now proceed to access your company in MyTax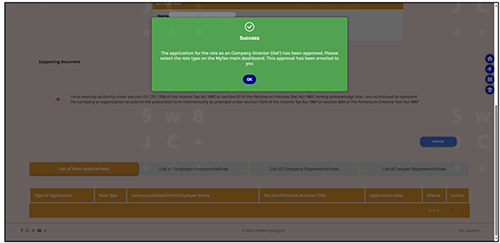
Step 5
Go back to MyTax home page and you will then be able to access your company from there.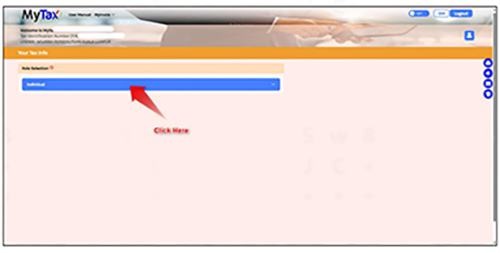
After linking my company to my MyInvois Portal Profile, how should I setup my company taxpayer profile.
Step 1
After linking your company, log in to MyInvois Portal and setup your company/taxpayer profile.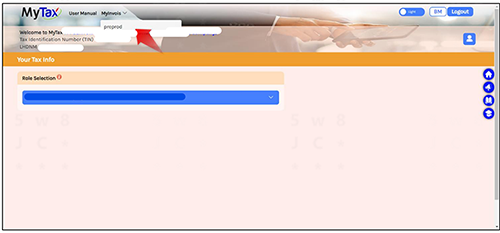
Step 2
It will prompt you for first time self-register taxpayer profile page. Scroll to the bottom and tick accept on the terms and condition check box and click “Continue”.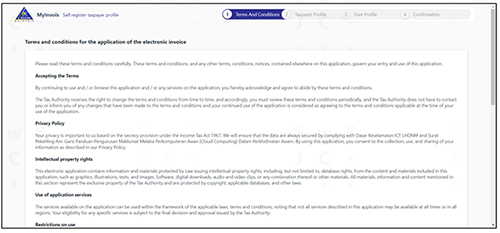
Step 3
Check your taxpayer profile details, key in any blank mandatory fields if required. Once you’re done, click “Save”.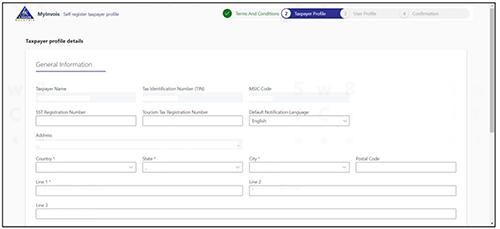
Step 4
Next will be your user profile, key in your email and click “Save”.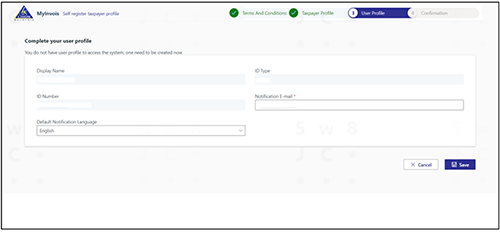
Step 5
At last, it will show you a registration complete page. Click “Finish Setup” to proceed.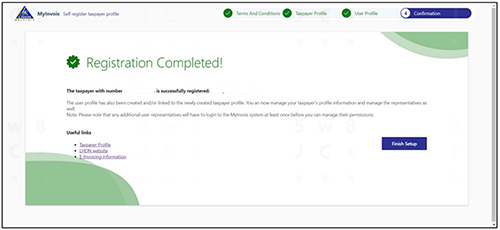
Step 6
You will then be directed to your company MyInvois Portal page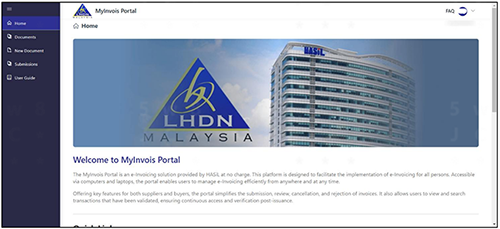
What do I need to do before I can submit invoices to LHDN for validation?
In order to submit e-Invoice to LHDN for validation via OCBC Velocity, your business must have a taxpayer profile first. Subsequently you must first assign OCBC as an “intermediary” on the MyInvois Portal.
Following that, if you are on Basic Plus Service Package, or you are an Authoriser on the Classic Service Package, you can link OCBC to MyInvois Portal as intermediary.
The following are the steps required to complete the assignment of OCBC as your intermediary.
In MyInvois Portal,
Step 1: Go to your taxpayer profile page
Log in to the MyInvois Portal. On the top-right corner of the page, click on your profile icon and select View Taxpayer Profile.
Step 2: Add OCBC as an intermediary
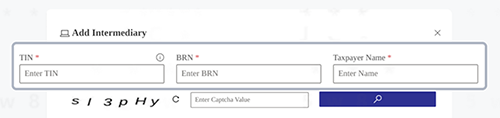
2.1 Go to the Representatives section, select Add Intermediary.
Enter the following details according to the type of account you have with us.
For OCBC Bank customers
TIN: C5867903000
BRN: 199401009721Taxpayer Name: OCBC BANK (MALAYSIA) BHD
For OCBC Al-Amin Bank customers
TIN: C20552760040
BRN: 200801017151Taxpayer Name: OCBC AL-AMIN BANK BERHAD
2.3 Specify your permission preferences.
Set representation period by selecting the start and end dates. If you want the representation to continue indefinitely, simply leave the end date field empty.
This will specify how long OCBC can act on behalf of your entity. Enable all permissions by in the Permissions section.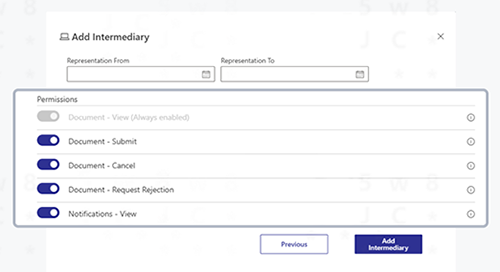
Step 3: Verify setup
Ensure that OCBC Bank is listed as an intermediary.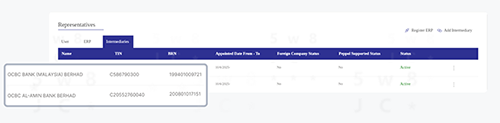
In OCBC Velocity Invoice Management,
Step 4: Go to your OCBC Velocity Invoice Management MyInvois Portal intermediary
Log in to the OCBC Velocity. On the top of the page, click on manage and select MyInvois Portal Intermediary.Step 5: Connect OCBC to MyInvois Portal
5.1 After completing Steps 1–3 in MyInvois Portal, select “I have completed the setup.”5.2 Select OCBC entity (OCBC MY, OCBC Al-Amin, or OCBC MY and OCBC Al-Amin) based on Step 2.2 setup. Enter Tourism Registration Number if available. Ensure “Representation From” and “Representation To” match the details in the MyInvois Portal and click on “Connect OCBC to MyInvois Portal”
5.3 Once connected, OCBC will be linked to your MyInvois Portal. All e-Invoice documents (sales and self-billed) created will be submitted to LHDN for validation, based on your specified representation period.
Note: E-invoices created by customers via OCBC Velocity Invoice Management are submitted to LHDN through OCBC, which acts solely as an intermediary. As such, all e-invoices details - including invoice amount, currency and other related information - are fully responsible of OCBC customer. OCBC does not validate, verify, or modify any of these details. Only e-invoice information is transmitted to the MyInvois Portal; no banking details are included in the submission.
What do I need to do in MyInvois portal before I can retrieve e-Invoices from MyInvois Portal?
To retrieve e-Invoice from MyInvois Portal, your business must have a taxpayer profile. You must first give us permission to retrieve e-invoices on your behalf by registering OCBC as an enterprise resource planning (ERP) system on the MyInvois Portal.
Following that, if you are on Basic Plus Service Package, or you are an Authoriser on the Classic Service Package, you can connect OCBC to MyInvois Portal ERP system.
The following are the steps required to complete the registration of OCBC as an enterprise resource planning (ERP) system on the MyInvois Portal.
In MyInvois Portal,
Step 1: Go to your taxpayer profile page
Log in to the MyInvois Portal. On the top-right corner of the page, click on your profile icon and select View Taxpayer Profile.

Step 2: Register OCBC as an ERP system
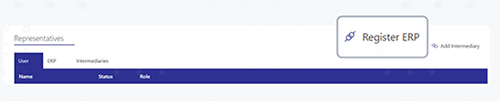
2.1 Go to the Representatives section, select Register ERP.
2.2 Enter the required details.

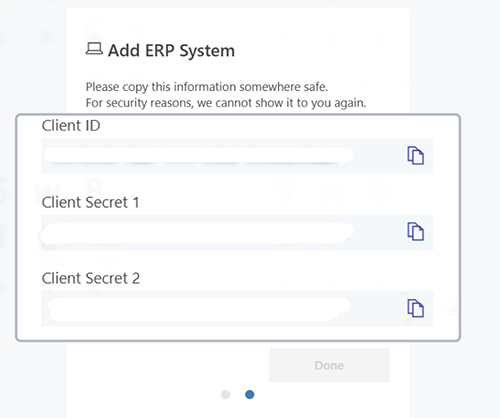
2.3 Complete the setup.
Copy the details for “Client ID”, “Client Secret 1” and “Client Secret 2” and store them someplace safe. You will need to refer to the same details later.
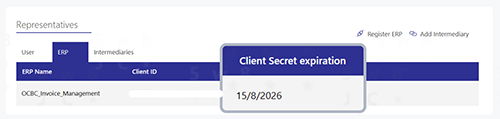
Step 3: Verify setup
Ensure that OCBC is listed as an ERP system and take note of the “Client Secret expiration” date.
In OCBC Velocity Invoice Management,
Step 4: Go to your OCBC Velocity Invoice Management > MyInvois Portal ERP system
Log in to the OCBC Velocity. On the top of the page, click on Manage and select MyInvois Portal ERP system.Step 5: Connect OCBC to MyInvois Portal
5.1 After completing Steps 1–3 in MyInvois Portal, select “I have completed the setup.”5.2 Paste the “Client ID”, “Client Secret 1” and “Client Secret 2” that you store them someplace safe and fill in the client secret expiration as per the ERP system list.
5.3 Your request will be in processed for validation with LHDN. If your request is successfully:
- OCBC will be connected to MyInvois Portal as an ERP system.
- You will receive a confirmation email once the connection is complete.
- Upon successful connection, we will automatically retrieve your past 10 days of e-Invoice documents and continue syncing twice daily at 12:00 AM and 12:00 PM to ensure your records remain up to date.
If the request is unsuccessful:
- OCBC will not be connected to the MyInvois Portal.
- You will receive an email notification regarding the failure.
- To proceed, please ensure the “Client ID”, “Client Secret 1” and “Client Secret 2” and “Client Secret Expiration” are accurate and match those in the MyInvois Portal.
Can I include my company’s logo on the invoice?
Yes. Please take the following steps to do so.
Step 1
Go to “Invoice” > “Manage” > “Setup” > “Template”.Step 2
Upload an image of your logo under “Logo”. To do so, either (a) drag and drop the image, or (b) click on “browse” and select an image. Preview the logo, then click on “Save”.Can I decide the prefix of my invoice number?
Yes, you can set a default prefix to appear before your invoice numbers (which we automatically generate to save you the hassle of manual entry). For example, “INV” would be a prefix in invoice number “INV12345678”.
To set a prefix, go to “Invoice” > “Manage” > “Setup” > “Template”. Then, indicate your preferred prefix in the “Invoice no. prefix” field and click on “Save”.
Tip:You can also set prefixes for your credit note numbers, debit note numbers, refund note numbers, and purchase order numbers.
Can I save the information of my products, customers and suppliers for future use?
Yes, you can set and save your products and services, and customer and supplier information, ahead of time. This allows you to easily apply the information to your invoices, credit notes debit notes, refund notes and purchase order.
- To pre-set your products and services: Manage > Setup > Products and services > Add product/service.
- To pre-set your customer and supplier information: Manage > Setup > Contacts > Add contact
- To easily create records of multiple products/services or customers/suppliers, use our file upload function: Go to “Manage” > “Setup” > “File upload” > Download the relevant template and enter the required details > Upload the completed file.
-
III. Understanding e-Invoice documents statuses
Each e-Invoice submitted via OCBC Velocity Invoice Management will reflects current status. These statuses are divided into two categories:
Invoice Management Status
Status Description Draft e-Invoice is created and saved as draft but not yet submitted. In progress e-Invoice has been submitted and is pending processing by LHDN. Sent e-Invoice has been successfully created or validated by LHDN (if customer have setup MyInvois Portal intermediary). Validation failed e-Invoice submission to LHDN failed due to validation errors. Rejected e-Invoice was rejected by the recipient. Cancelled e-Invoice was cancelled by the issuer. Received e-Invoice was received through offline channels or retrieved from MyInvois Portal. Overdue (Invoice) Invoice remains unpaid past its due date. Expired (Credit note, Debit note, Refund note) Credit note/debit note/refund note remains unpaid past its due date. Paid (Invoice) Invoice is fully paid and the outstanding amount is cleared. Used (Credit note, Debit note, Refund note) Credit note/debit note/refund note is fully used and the outstanding amount is cleared. Partially paid (Invoice) Only part of the invoice amount has been paid. Partially used (Credit note, Debit note, Refund note) Only part of the credit note/debit note/refund note amount has been used. LHDN Status
Status Description Pending e-Invoice has been submitted to LHDN and is pending validation. Success e-Invoice has passed LHDN’s validation checks. Failed e-Invoice did not pass LHDN’s validation checks. Cancelled e-Invoice that has passed LHDN validation is cancelled.
-
IV. Creating e-Invoices and purchase orders
How do I create and submit e-invoices for LHDN validation?
Step 1
Go to “e-Invoice documents” > “Create” > Choose the e-invoices typeStep 2
Choose the invoice transaction type and provide basic invoice information under the “Header” tab, such as the document submission account, payment terms, tax rate(s), recipient’s information and payment method (how you want the recipient to pay you.)Step 3
Provide the line item(s) for the invoice under the “Details” tab. To do so, enter the details for each item, then click on “Add”. Alternatively, you may click on the magnifying glass icon to apply any pre-set products/services or click the star icon to choose from your favourite pre-set products or services. Please refer Section II:
Getting Started Question 8 for instructions on setting up pre-set products and services.Step 4
If you have any optional information to include with this invoice, such as shipping information or import and export information, you may provide it as follows:- - Shipping information should be filled in when the goods are shipped to a recipient or address different from the buyer’s details.
- - Import and export information should be included when the invoice pertains to the import or export of goods.
Step 5
- - If you have any supporting documents to be archived with this invoice, you may upload them* under the “Supporting docs (internal reference)” tab. These are for your reference only and will not be sent to the recipient.
*A maximum of one file can be uploaded. If you have multiple documents to upload, consider compressing (zipping) them and uploading the ZIP file.
Step 6
Click on “Submit” to send the invoice to your customer. When you do so, the invoice will be sent to LHDN for validation if you have completed MyInvois Portal Intermediary setup. If you are not ready to send the invoice, please click on “Save draft” instead –this allows you to edit the draft later.Can I edit e-Invoices after submitting to LHDN?
Unfortunately, you will not be able to edit e-Invoices once they have been submitted to LHDN for validation. Please ensure that all information is accurate before sending any documents to LHDN.
However, you can cancel the e-Invoices within 72 hours and re-submit your eInvoices.How can I request for cancellation for an e-Invoices?
Businesses can request for cancellation of an e-invoice within 72 hours of einvoices that had been validated. After this period, request for cancellation to einvoices are not allowed. If any changes are required after 72 hours, businesses must issue a new invoice, debit note, credit note, or refund note. For more information, please refer to Section VII Request for cancellation.
How do I create an invoice from a purchase order?
If you previously created a purchase order and are now ready to send an invoice to the customer, you can easily create an invoice by following the following steps.
Step 1
Find the relevant purchase order at “Purchase orders” > “View” > “Sales” or “Bills”.Under “Action”, click on “Create invoice from PO”
Choose the type of invoice you wish to create.
Step 2
Check the information populated from your purchase order. Edit the details if needed before sending the invoice.
-
V. Managing Bills and self-billed e-invoices
How do I create and view records for all bills e-Invoices and purchase orders received?
If your suppliers send invoices, credit note, debit note, refund note or purchase order to you such as email, you can create bill records on OCBC Velocity for tracking and reconciliation purposes. Please take the following steps.
Creating a record
Choose the invoice transaction type and provide basic invoice information under the “Header” tab, such as the document submission account, payment terms, tax rate(s), recipient’s information and payment method (how you want the recipient to pay you.)Viewing a record
After creating the bill record, you will be able to view it at “e-Invoice documents” > “View” > “Invoices” > the “Bills” tab. Click on the invoice number to see the details of the invoice.Why do I need to create self-billed invoices which will sent to LHDN for validation?
Self-billed invoice is issued when the Buyer is required to issue an e-Invoice on behalf of the Supplier. Situations where you are required to do self-billed invoice is when:
- - Payment to agents, dealers or distributors
- - Goods or services sold are rendered by a foreign supplier
- - Profit distribution within a company
- - E-Commerce
- - Acquiring goods or services from an individual not conducting a business
- - Interest payment
-
VI. Managing e-Invoice documents retrieved from MyInvois Portal
How do I view e-Invoices retrieved from LHDN?
Step 1
After you have register ERP system in MyInvois Portal, go to “Manage” > “MyInvois Portal ERP system” and paste the “Client ID”, “Client Secret 1” and “Client Secret 2” and “Client Secret Expiration” are accurate and match those in the MyInvois Portal.Step 2
Upon successful connection in OCBC Velocity, you can access your e-Invoices retrieved from MyInvois Portal by navigating to “e-Invoice Documents” > “View” > Select the e-Invoice Type. OCBC Velocity will automatically retrieve your past 10 days of e-Invoice documents and continue syncing twice daily at 12:00 AM and 12:00 PM to ensure your records remain up to date.These e-Invoices can be easily identified by Source labelled as “MyInvois Portal”, allowing you to conveniently track and manage them. To view invoice details such as the invoice amount, line items, and payment information—simply click on the invoice number.
-
VII. Request for cancellation
What is request for cancellation e-invoices?
LHDN allows businesses to cancel e-Invoices, and you can issue a new one. However, cancellation must occur within 72 hours after the e-Invoice has been validated by LHDN. If the 72-hour window has passed, cancellation is no longer allowed, but you can still issue a credit note, debit note, or refund note to correct the mistake.
How can a seller request for cancellation?
Please take the following steps.
Step 1
Find the e-Invoices that have been successfully validated by LHDN and that you wish to cancel. Then, click on “Cancel” within 72 hours of validation.Step 2
Select the reason for cancellation.What is the time limit for cancellation?
You must request for cancellation within 72 hours of the e-Invoice being validated by LHDN. After 72 Hours, request for cancellation is no longer allowed.
What if the 72-Hour Cancellation Window Has Passed?
If you miss the 72-hour deadline, you cannot cancel the e-Invoice, but you can submit a new document such as credit, debit or refund note.
-
VIII. Request for rejection
What is request for rejection e-invoices?
LHDN allow business to request for rejection when receives an e-Invoice from a supplier and the e-Invoice may contain errors such as:
- - Wrong company information
- - Incorrect items or descriptions
- - Pricing discrepancies
If you do not agree with the e-Invoice, you must reject it within 72 hours after the document is validated. If the 72-hour timeframe is missed, the only way to correct the mistake is by issuing a credit note, debit note, or refund note.
How can a buyer request for rejection?
Please take the following steps.
Step 1
Find the e-Invoices that have been successfully validated by LHDN and that you wish to reject. Then, click on “Reject” within 72 hours of validation.Step 2
Select the reason for rejection and submit.Step 3
If seller agrees with the reason for rejection, seller will need to cancel the eInvoices.Note: After buyer initiates rejection request, the seller must cancel the e-Invoice upon buyer’s request for rejection before the e-invoice can be successfully cancelled.
What is the time limit to reject e-invoices?
You must request for rejection within 72 hours of the e-Invoice being validated by LHDN. After 72 Hours, request for rejection is no longer allowed.
Does submitting a rejection request automatically cancel the e-Invoice?
No. A rejection request does not immediately cancel the e-Invoice. Your seller must cancel the e-Invoice in response to your rejection request. If the seller does not take action within 72 hours, the e-Invoice will be automatically considered valid. Any further changes will require the submission of a new document, such as a credit note, debit note, or refund note.
-
IX. Reconciling invoices
What is reconciliation and what are its implications?
Reconciliation is the practice of tracking whether an invoice has been paid (by marking the status as “paid”, “partially paid” or “overdue”) and indicating the transaction details, including any outstanding amount.
Records of reconciliation are meant for internal use and are not visible to your customers or suppliers.
- - Reconciling sales e-Invoices allows you to track whether your customers have paid you and how much they have paid.
- - Reconciling bills allows you to track whether you have paid your suppliers and how much you have paid.
What types of invoices can be reconciled via OCBC Velocity?
You can reconcile e-Invoices documents.
If I want to reconcile invoices against transactions made using my OCBC account, how do I do so?
If an invoice payment was made using your OCBC account, you can record it easily by taking the steps below.
Step 1
Look for the invoice you wish to reconcile and click on “Reconcile”.Step 2
Click “Select from list”, select “Account” and search for the relevant transaction.Step 3
Review the transaction details and provide additional information if needed. Then, click on “Add”.Step 4
After recording the transaction(s), the outstanding amount of the invoice will be updated accordingly. If the invoice was not fully paid, you can return later to add more transactions.Can I simply mark invoices as paid without adding more transaction details?
Yes. Simply go to the relevant invoice and click on “Mark as paid”. The status of the invoice you mark as paid will be changed to “Paid”.
What if I made a mistake during reconciliation?
You will be able to amend the details of your reconciliation.
- - If you initially reconciled an invoice by adding payment records, go to that invoice and click on “Reconcile”, then delete the payment records you added in error. The outstanding amount and invoice status will be updated accordingly.
- - If you initially reconciled an invoice by clicking on “Mark as paid”, simply click on “Mark as unpaid” to change the invoice status.
Auto reconciliation of Sales Invoices
Your sales invoices will be automatically marked as "Paid" only when full invoice amount is paid through one of the following methods.
- - Scanning of JomPAY QR or DuitNow QR; no payment details can be changed, or
- - Via JomPAY with correct biller code and input the invoice number in Ref-1; or
- - Via bank transfer, if the following are included:
(a) Invoice number in the payment reference
(b) Payment made to your specified bank account
Manual reconciliation is required if the conditions stated above are not met. Please ensure the invoice number contains non-alphanumeric characters and payment is made via DuitNow, GIRO, or internal funds transfer. Always review and update the status of invoices.
-
X. Creating multiple invoices
File Upload
Our file upload function allows you to create multiple invoices, credit notes, debit notes, refund notes or purchase orders at a time.
To do so, enter – or copy and paste – invoice data into our Microsoft Excel templates and upload the completed templates.
Step 1
Go to the relevant file upload page and download the template you need.- To create invoices, credit notes, debit note and refund note, go to “eInvoice documents” > “Upload”.
- To create purchase orders, go to “Purchase orders” > “Upload”
Step 2
Enter the required details in the template, upload it and click on “Upload”. If you enter the details in the correct format, all your documents will be created immediately. To view them, go to the respective document tab and click on “View”.Duplicate
Our “Duplicate” function allows you to easily create new invoices, credit notes, debit notes, refund notes and purchase orders that have similar content to others you have created in the past.
Step 1
Find the invoice, credit note, debit note, refund note or purchase order that you intend to duplicate and click on “Duplicate”.Step 2
The system will populate the same information that was in the selected invoice, credit note, debit note, refund note or purchase order under a new invoice, credit note, debit note, refund note or purchase order number. Please review the information; if it is in order, you can click on “Complete” to create or send the document immediately.
Need to create multiple invoices, credit notes, debit note, refund note or purchase orders at the same time or repeatedly? Here are two features that can speed up the process
-
XI. Managing settings for notifications and payment reminders
Remind buyers that payment is due soon
We can send reminders to your buyers’ email address(es) before and/or on the due date. You can even choose when to send the reminder e.g. if the payment is due on 3 June and you choose to send the reminder one day before the due date, our reminder email will be sent on 2 June.
To set this up, go to ‘Manage’ > ‘Setup’ > ‘Template’ > ‘Remind buyer that payment is due soon’. If there are invoices that omit the buyer’s email address, we will not be able to send reminders pertaining to these invoices.
You can also manually trigger payment reminders to buyers. To do so, look for the relevant invoice and click on ‘Payment reminder’.
Get a summary of payments due soon
We can send a summary of payments due soon (for sales invoices and bills) to your email address(es) before and/or on the due date. You can even choose when to send the reminder e.g. if the payment is due on 3 June and you want the system to send the reminder one day before the due date, our reminder email will be sent on 2 June.
To set this up, go to ‘Manage’ > ‘Setup’ > ‘Template > ‘Get a summary of payments due soon’.
How do I send notificaitons and payment reminders?
You can use Invoice Management on OCBC Velocity to send payment reminders: